Knoxville, TN

Ludum Dare 46: Procedurally generating potted plants in Unity

May 11, 2020

For Ludum Dare 46, I created a very simple tamagotchi game called “Potted Plant Simulator” in Unity (you can find the code here). We kicked around this idea for “Keep it Alive” at the Knox Game Design online meetup, but it was more or less a joke.

However, brainstorming brought me back to the idea because I started wondering about how to procedurally generate a plant in Unity. I speculated that Unity’s hierarchy system (which localizes position, scale, and rotation to the parent node) would let you chain together branches, and I had to test that hypothesis. (Spoiler: hierarchy does not seem to be the best way to handle this.)

Continue reading

Stupid Unity UI Navigation Tricks

November 24, 2018

A few months back, I played around with (yet again) rebuilding a half-finished Metroidvania-style game I’ve played around with off and on over the years.

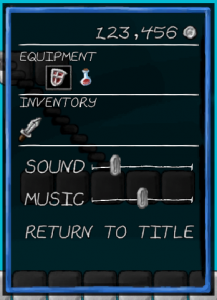
One of my goals in this experiment was to use base Unity functionality as much as possible, replacing 2D Toolkit and custom systems as much as possible. One of the prime candidates for such a rewrite was the menu system:

If it’s not immediately obvious, that’s essentially a vertical menu with items that have horizontal behaviors. When “Equipment” is selected, you can choose an item to use or equip on the horizontal axis. When a volume slider is selected, you can adjust the value with the horizontal axis.

Importantly, the game’s intended to be played with a gamepad, so I didn’t want the presence or absence of mouse or touch input to affect this behavior.

Unity UI navigation is pretty smart, and got me most of the way there. If you’ve focused on mouse/touch interface when building your UI, good news: if it’s a grid-ish format, it probably works the way you’d expect. That’s thanks to…

Continue reading

Using a Kindle Fire as a demo device for gamedevs

August 22, 2018

I’ve been readying my demos for the Knox Game Design booth at the Knoxville Gaming Convention, which includes setting up some new demo tablets. Having used a Kindle Fire for demos a before, I feel like it’s a fairly reliable setup for anyone who develops Android games, so I thought I’d share it.

First, why?

The goal here is to have a device specifically for demos. I’d rather not put my personal tablet or phone, which is linked to my Google Play or Amazon Appstore accounts, up for public access.

I have an Intel Compute Stick (which runs $100-$200) that I can use to run full-fledged PC demos. It’s nice and flexible, but it means I have to carry around a TV for each demo station I want to run.

I like Kindle Fires as demo devices for a few reasons:

  • They’re cheap if you’re patient. If you watch Amazon.com deals and Woot.com (under Computers > Tablets), you can occasionally find good deals on older 6″ or 7″ Kindle models. For your average hobbyist developer, you don’t need anything fancier than that. I’ve bought a couple for $20-$30.
  • They’re fairly reliable. Given how fragmented Android is, I’m not inclined to trust the performance of off-brand tablets for games, so getting a name-brand tablet (especially a name brand that’s essentially building its own platform) seems like a safe bet to me.
  • Most models have a physical HDMI out. This was the real selling point for me. Sure, you don’t need it all the time, but it’s nice to be able to mirror something on a larger screen. (For a booth, it’s definitely more attention-grabbing than a row of tablets.)

Pay attention to the Android version

Remember that recent versions of Unity (e.g., within the last year or so) will not build to versions of Android before 4.1. If you’re buying a demo device that runs Android, make sure it can be officially upgraded to 4.1 or later, or you’ll need to rebuild your game in Unity 5. (Yes, there may be homebrew ROM upgrades available, but it may take some trial and error.)

For Kindle Fire, this means anything 2013 or later. If you want to be sure, there’s a list of versions and their corresponding devices on the Wikipedia page for Fire OS.

Setting up your Kindle Fire

If you’ve bought a tablet, you know how this goes. Your first startup is a tour of all the basic questions like language and wifi access, usually culminating in the option to login.

The key point here is to skip registering an account. You should have the option to do this during the process (for some models, you may have to go back to the previous step to do so), and the tablet should still work if you do.

If you bought a Kindle off of Amazon, the device may come pre-registered. You should find an option in Settings > Account to de-register the device.

Side-Loading your App

You don’t have to put your game on the Amazon Appstore to install it on your device; you can copy over the APK and install it from a file manager.

  1. Connect the tablet to your PC with a USB cable, and copy over the *.apk file to the file system.
  2. Go to Settings > Device and set “Allow installation of apps from unknown sources” to “Yes.”
  3. Open either Docs (newer) or OfficeSuite (older). (If you open OfficeSuite, you may have to open Filter and select “Show all files.”)
  4. Open the APK and choose to install the application.

If you get a “parse error” when you open the APK, go back and compare the tablet’s Android version to the minimum Android API level you selected in Unity.

Once installed your icon will show up on the complete list of apps. (It won’t necessarily show up on Games or certain other sections, simply because those aren’t available unless you register your Amazon account.)

Connecting to a TV

Physically mirroring your tablet to a TV is easy, but it requires some extra equipment you probably don’t have laying around.

The Kindle Fires I have use either SlimPort enabled USB (newer?) or micro-HDMI (older).

In the case of the USB, you can buy an adapter that will allow you to connect to both a HDMI cable (for mirroring) and a USB-B cable (for charging). This is the model I bought.

In the case of micro-HDMI, you’ll have a micro-HDMI port alongside your USB. (The HDMI port will be the wider of the two.) In this case, all you need is a micro-HDMI to HDMI cable.



Four ways to handle UI text in Unity

May 4, 2018

While converting some old 2D Toolkit-based Unity code to plain vanilla Unity recently, I ran into a conundrum: Unity’s got great support for standard font formats, but still isn’t quite up to par with tk2d’s support for building fonts from spritesheets.

An example of a sprite font

An example of a sprite font

It’s a minor issue–after all, it’s easier and more legible to drop in an existing font–but I wanted to keep the hand-drawn look.

So, I fell down the rabbit hole of cataloging the different options Unity provides for UI text (including TextMesh Pro, recently acquired by Unity and built in to 2018.1). While my knowledge of typography is pretty shallow (and it seems to be a rather complex topic), this should give you an idea of what’s out there and why you might want to use it.

Continue reading

“LINQPad Cookbook” slides and samples from CodeStock 2018

April 22, 2018

Here are the slides and sample code from my presentation “LINQPad Cookbook” at CodeStock 2018. (Sample code should contain test data and all necessary DLLs.)

RPG Maker MV Scripting First Impressions

September 16, 2017

I started looking into RPG Maker MV to update some of my VX Ace scripting panels and posts, and… it’s different. If you’ve read some of those posts, here’s a few things that might help with the transition.

Continue reading

Using Source Control with RPG Maker VX Ace

May 13, 2017

I mentioned in my intro to RPG Maker scripting post (and in the panel that’s based on it) that you can use source control systems like Mercurial or Git with RPG Maker VX Ace, allowing you to take periodic snapshots of your work.

(First, you’ll want to read a tutorial about how your chosen source control system works, such as hginit.com for Mercurial. This post will make a lot more sense once you do.)

What I neglected to mention is there’s two big, easy-to-forget gotchas with this setup.

Continue reading

RPG Maker VX Ace scripting: Thinking through a UI change

January 17, 2017

My last post was basically an info dump on what I’d learned about RPG Maker Ruby scripting during Ludum Dare 37. From the comments I got on it, I realized “info dump” is not an exaggeration–it’s literally a bunch of abstract, raw information without any examples, and so it’s confusing if you haven’t messed with it before.

So, let’s walk through how we’d think through a very simple change.

Continue reading

RPG Maker VX Ace Ruby scripting crash course

January 9, 2017

Ludum Dare 37 was the first time I’d really, truly built a finished product in RPG Maker rather than tinkering, and I learned a lot. Given that RPG Maker scripting doesn’t seem to be a well-known topic among more casual users, it seems like a good idea to try to summarize a lot of what I picked up.

Continue reading

Instantiating a Procedurally Generated Platformer in Unity

December 12, 2016

This is a follow-up to my last post, Building a Procedurally Generated Platformer, which (not being a disciplined blogger) I’d sort of forgotten about until a comment about an off-hand remark I’d made about another blog post popped up in my RSS feed. Then (again, not being a disciplined blogger), I forgot about that half-finished post until I started thinking about writing a new post and checked my WordPress admin.

In the last post, we discussed one way you could randomly generate a two-dimensional array of values representing ground, platform, and trap tiles. For example, it might look like this:

ProceduralGeneratedPlatformerBlog9
The trick, of course, is to convert each of these chunks into actual Unity objects, and to do so in a way that performs well.

Because we’ll be adding new chunks as needed, we want to make sure we don’t freeze play due to adding large chunks that are costly to instantiate. Because we want to restart the level quickly (without reloading the scene), we want to minimize the cost of creating new game objects.

Continue reading

×