
In part 1, I covered why you might want to use nanDECK in prototyping a card game. Now, let’s get into the nuts and bolts of building a template.
A simple example
In my last post, I mentioned that Player Actions were simple title-and-description cards. In fact, that’s all that’s really in my spreadsheet: Title, Description, and Count (for the number of copies of each card in the deck). Note that I’ve also got a calculated field in my spreadsheet showing the total number of cards in the deck–in this case, 86.

“Description” belies some complexity: I want to be able to include line breaks and, if possible, formatted text.
Of course, there’s the game design equivalent of a “code smell” here–if I’m regularly using the same mechanics over and over, then I probably need to introduce some keywords. And if I’m introducing multiple keywords, then maybe that needs to be its own column in my CSV, rather than a bold term that appears in the Description.
For example, my Action deck has a few cards that players can keep for semi-permanent effects, so why write out “players can keep this, can only have one copy, etc. etc.” on every card? Applying the label “Item” would be far simpler, and then refer the player to the rulebook.
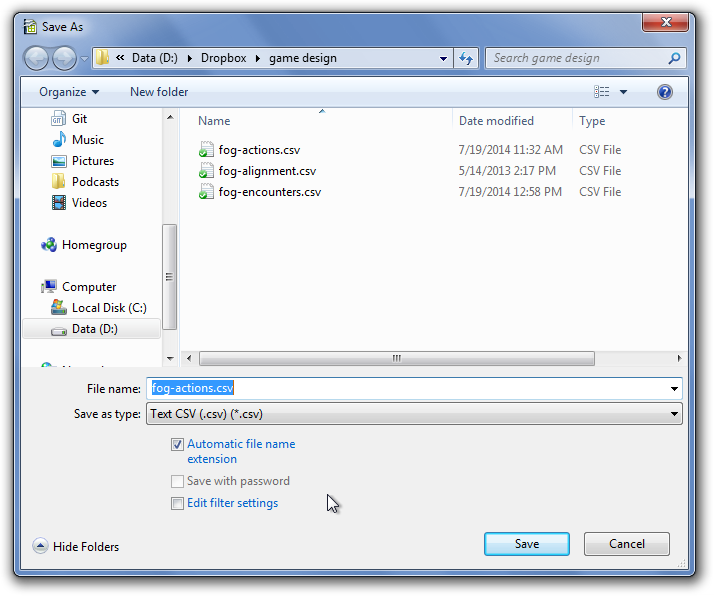
Once we’ve got a spreadsheet set up in Excel or OpenOffice, we need it in a text format that nanDECK can read. To do this, go to Save As… and select either “Comma separated values” or “CSV.” Don’t worry too much about options, as the defaults will work for most scenarios–just make sure that the delimiter is CSV.
Now, let’s take a look at the configuration I’m using for this deck. Note that every directive from this section is explained in the nanDECK manual. If you want to follow along, you can download the .nde file here (you’ll need to provide your own CSV file with Title, Description, and Count columns.)
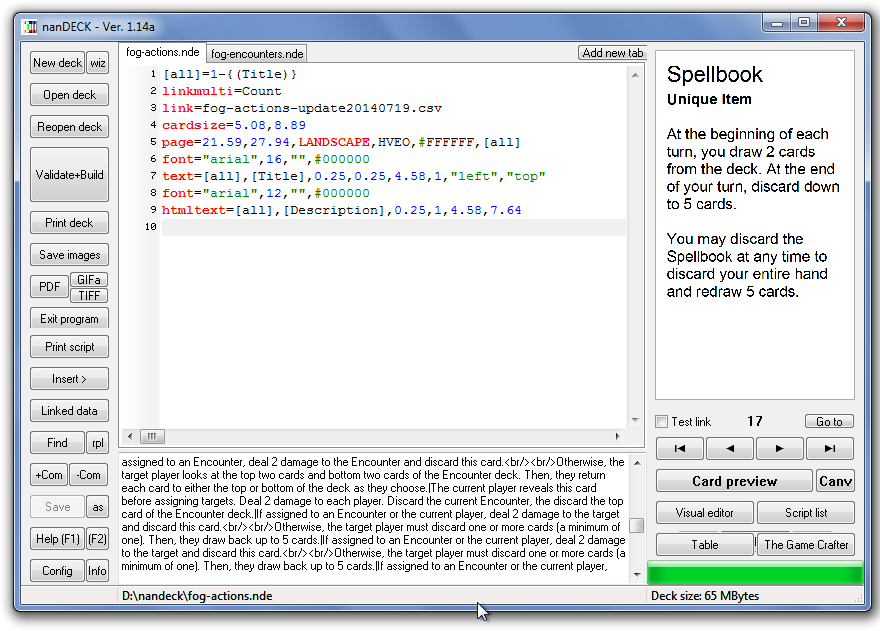
Building a template in nanDECK is somewhere between creating a configuration file, programming, and writing HTML. Every line starts with a directive (the text on the left side of the equals sign) that is passed a number of values (the list, separated by commas, on the right side of the equals sign).
Order is sometimes important, and you can create conditional blocks, but there’s typically not the sort of “flow control” you think of when programming. (Again, if your layout is getting that complex, you’re probably out of the prototyping stage anyway.)
First, we’ll set up a variable called [all], which will represent all cards in the set. The line below might be best read as “[all] represents a set of cards starting at 1 and ending with the last row that has a Title value.” (I’ve never found a reason not to do this. Multiple card formats probably should be stored in separate layouts and spreadsheets.)
[all]=1-{(Title)}
Next, we tell nanDECK that the “Count” field in our spreadsheet represents the number of copies of each card:
linkmulti=Count
We also tell nanDECK where to find that spreadsheet. In this case, we assume that we’re storing the CSV in the same folder as our nanDECK NDE file:
link=fog-actions-update20140719.csv
Next, we want to define the size of each card. nanDECK will use this to lay out our cards.
cardsize=5.08,8.89
I know what you’re thinking: those numbers look odd. That’s because nanDECK uses centimeters, not inches. (Yes, it’s a hassle, but Google will easily do these translations for you.) We’re just talking about a normal 2″ x 3.5″ business card here: width first, then height.
We also need to tell nanDECK what size paper we’re using:
page=21.59,27.94,LANDSCAPE,HVEO,#FFFFFF,[all]
That’s a lot of parameters, but nanDECK should give us some hints (though we’ll really need to refer back to the manual on what it means):

Again, the first two parameters are in centimeters. We’re just telling nanDECK that our page is 8.5″ wide (21.58cm) by 11″ tall (27.94cm), in landscape mode, centered vertically and horizontally (the HV), has no printed guides on either odd or even pages (the EO), is white, and should be used for all cards in the set.
That’s a mouthful, but remember: if we stick with one type of paper for all our card prototyping, we can copy and paste this into every template without having to think about it.
Next, let’s actually write some text:
font="arial",16,"",#000000
text=[all],[Title],0.25,0.25,4.58,1,"left","top"
We’re telling nanDECK to use 16 point black Arial for whatever follows this TEXT directive. Then, we’re creating a text block on all cards in the set, with the Title value for each card printed out in the text block. Our text block should be indented 0.25cm from the top and left side of the card, and be 4.58cm wide by 1cm tall. (4.58cm + 0.25cm margins = 5.08cm wide card)
Note that we are defining the size of the text block, not just its position, which means it may get cut off. We’ll want to double check our layout against our card set before we actually print to make sure this doesn’t happen. (Typically, I print to PDF from nanDECK, review the PDF, and then print from there.)
To print the description, we do something similar:
font="arial",12,"",#000000
htmltext=[all],[Description],0.25,1,4.58,7.64
This time, we’re telling nanDECK that our text block containing the Description value for each card should be formatted as HTML. That means our <br/> tags will be interpreted as line breaks, and we can use <b> or <i> to format certain bits of text.
That’s all there is to it. If we type this into a nanDECK tab and click “Validate+Build,” we should see our cards to the right. We can then click “Table” to actually flip through our cards, ensuring that the randomization “feels” right.

The nanDECK Validate+Build and Table buttons
In the next post, we’ll get into conditional formatting.