
My last post was basically an info dump on what I’d learned about RPG Maker Ruby scripting during Ludum Dare 37. From the comments I got on it, I realized “info dump” is not an exaggeration–it’s literally a bunch of abstract, raw information without any examples, and so it’s confusing if you haven’t messed with it before.
So, let’s walk through how we’d think through a very simple change.
If you want to create a new project, you should be able to follow along. Note that I’m not formally teaching you how to write Ruby here–I’m just teaching you enough to be able to guess what a particular line of code might do. (Admittedly, this is exactly how I did the LD37 project.) It’s sort of like taking a list of common phrases when traveling to a foreign country.
Example
Let’s say we’re building a narrative-only game (like To The Moon), or a game where we want to tightly control the player’s progression by giving items or skills at key narrative points (sort of like Legend of Zelda).
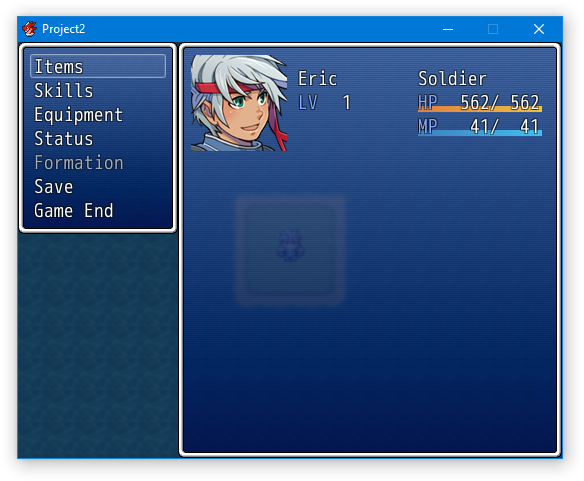
In this sort of game, we might not have the concept of “gold.” However, because RPG Maker provides a complete JRPG engine, it’s there on our status screen anyway:
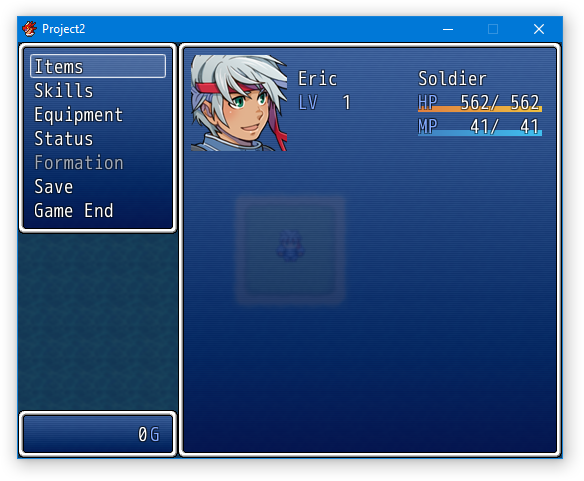
We could leave this window in, but it’s going to contribute to a tighter experience for the player if we remove unnecessary bits. The player won’t be distracted by trying to figure out which features are used and which aren’t, and won’t feel like we hacked this together.
So, we’re going to hide it. Our first step is to dive into the Script Editor:

Step 1: Where’s the code that affects this?
As discussed in the last post, there’s a lot of Ruby code in a default RPG Maker project. It’s intimidating–unless you have both copious programming and RPG Maker experience, it takes some effort to scan through it and figure out what it does.
Fortunately, we have a few guidelines to help us.
We know we’re looking for a window, so odds are the code is in a class that starts with Window_ or Scene_ (since scenes often show and hide windows on the screen).
Within these groupings, we know we’re probably looking for a class with Gold, Menu or Status in the name (since we’re looking for the gold window on the status menu screen).
Step 2: Skim the code
Since we have a vague idea of what the class that shows the gold window might be named, we can identify possible classes and skim them to see if they actually affect whether or not it’s shown on the menu screen.
The Window_Gold class might catch our eye–it sounds exactly like what we’re looking for: 
Upon further inspection, this class has methods like initialize, refresh, and open. It has properties like window_width that define how the gold window is shown, and value and currency_unit that define what the gold window shows.
(How do we know that? Well, the code for a class is contained in the class block, and each def block represents a property or method within that class. Each of these blocks is closed by an end statement. Indentation and comments–lines that start with a #, which indicate to Ruby they shouldn’t be executed–are used to make it more readable.
Note that if the classes, properties, and methods are named well, we don’t actually have to read through each one line-by-line to guess what it does.)
After skimming the code, it looks like Window_Gold doesn’t actually help us–it defines what the gold window looks like when it’s shown, not whether it’s shown. That’s OK, because we’ve narrowed down our search.
You might be tempted to think that we could just delete Window_Gold and be done, but code doesn’t exist in a vacuum. We should assume there’s code in another class that’s creating a new instance of Window_Gold. If we simply delete Window_Gold, then that code will cause a crash.
We might then skip to the Scenes section, since the gold window is likely part of a scene. Scene_Status sounds promising…
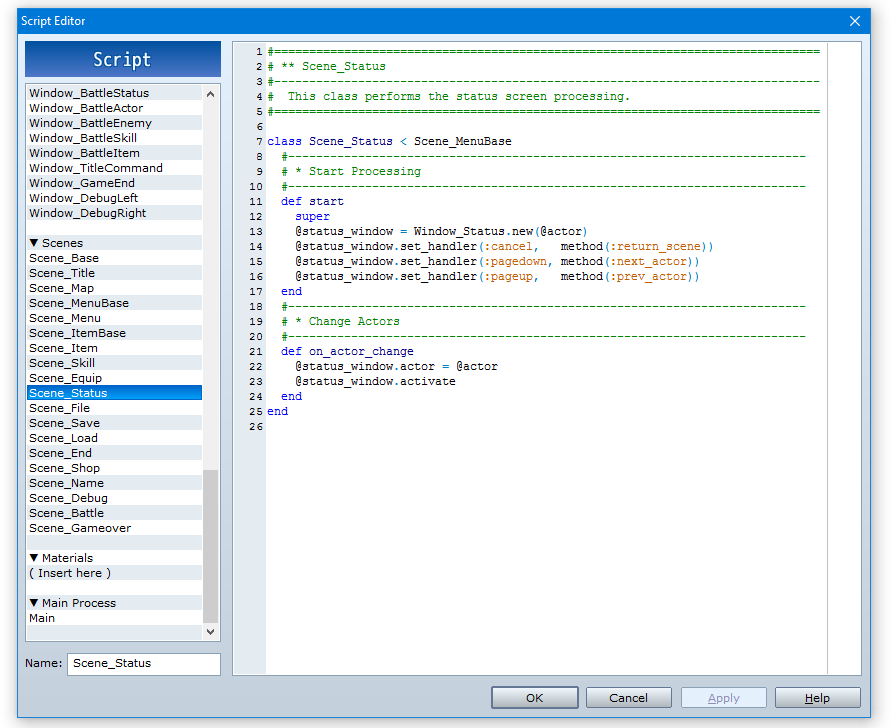
… but this seems to reference actors and menu commands (created by the set_handler method that’s called in start). We know our gold window is simpler than that.
We’ll check our other candidate, Scene_Menu:
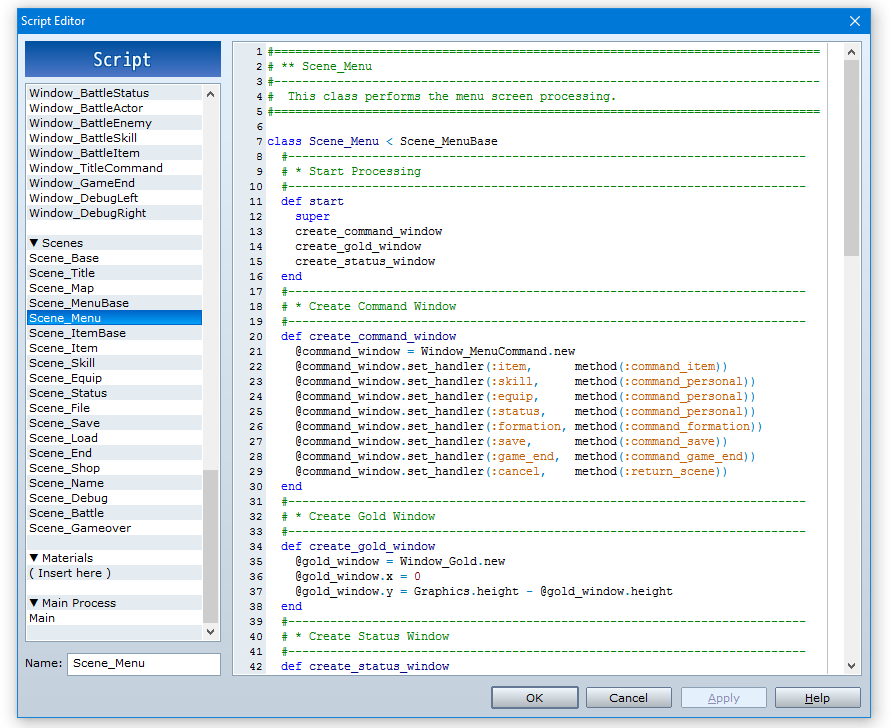
That’s it. Right there in the start method, there’s a call to a create_gold_window method.
If we read down a bit, we’ll actually see the method. At this point, we might actually want to read the code line-by-line to see what’s going on (although, since we’re removing the window it doesn’t really matter):
@gold_window = Window_Gold.new
We’re essentially saying, “whenever we’re displaying a Menu scene, store a copy of the Gold window in the scene’s @gold_window field.” That way, we can reference the gold_window whenever necessary. We’re also creating a new instance of the Window_Gold class to store in that field (which will call the initialization code we saw earlier).
Remember: a class is a template–an abstract concept. An object–in this case, an instance of the Window_Class–is a copy of that template that we can work with.
@gold_window.x = 0
@gold_window.y = Graphics.height - @gold_window.height
This code positions the window on the screen.
The first line says, “the X position of the window stored in @gold_window should be 0.” The second line says, “the Y position of the window stored in @gold_window should be the size of the screen, minus the height of the window.”
(Note that we can make some assumptions here simply by knowing that the window is positioned in the bottom-left corner. We know that windows are positioned by the top-left border, that screen coordinates run left-to-right and top-to-bottom, and that a class called Graphics exists that provides information about the screen.)
Step 3: Making the change
Now that we’ve figured out what code displays the window, all we have to do is remove it. (Of course, we’re using a simple example, and adding or changing existing code may be more complicated.)
Rather than remove the code outright, we’re going to do something called commenting out. The effect is the same, but it’s easily reversible.
Remember how we said that lines that start with a # aren’t executed? All we’ll do is add a # before the code we want to remove, turning it into a comment. If we ever want it back, we just remove the #.
When we make the change, it looks like this:
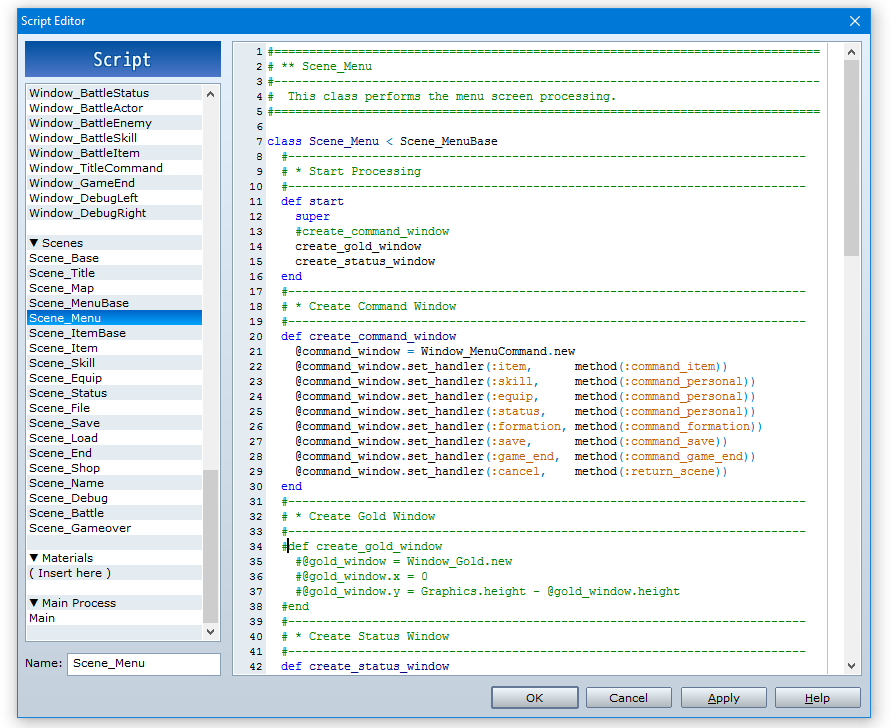
That’s all we have to do. When the Menu scene is created, it will no longer create an instance of Window_Gold.
Again, note that we commented out not just the method definition for create_gold_window, but also the reference in start that calls it. We commented out any code that references @gold_window, not just the line that creates it. This prevents crashes. It’s always good practice to use Ctrl-F to make sure you’ve removed all references to the class, method, or variable you’re removing.
Step 4: Testing
Now that we’ve made our change, let’s test it by running the game.
If we made the change correctly, our menu screen should now look like this:
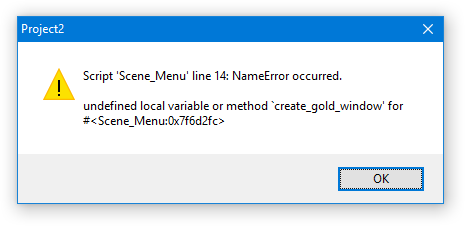
If we got that result, then we’re done! However, if we made a mistake we’ll see something like this:
Step 5: Troubleshooting
For the above example, I commented out the create_gold_window method definition, but I left the call to it in start.
It’s an intimidating, technical error message, but we can extract some useful information from it if we slow down and think about what it’s saying:
- Script ‘Scene_Menu’ line 14: Whatever went wrong, happened in line 14 of the Scene_Menu script. That’s a good place to start looking, and (generally speaking) will be the line of code that will be changed.
- NameError occurred: The type of error thrown by Ruby. It might not mean much to us in every case, but sometimes it’s useful. In this case, NameError just means Ruby couldn’t find anything named “create_gold_window.”
- Undefined local variable or method “create_gold_window” for #<SceneMenu>: I removed its method definition in Scene_Menu, so create_gold_window is undefined. We’re referencing it (in script Scene_Menu, line 14), but Ruby doesn’t know what we’re referring to.
When we get this error, we’ll simply repeat the process to figure out what went wrong, and change it.
Conclusion
This might feel like a lot of work for a simple change. We had to make a lot of decisions just to remove a simple bit of functionality. However, they’re simple decisions–and the more you write code and work with RPG Maker, the easier they’ll be, because you’ll be familiar with the general patterns to the code.