
This is a follow-up to my last post, Building a Procedurally Generated Platformer, which (not being a disciplined blogger) I’d sort of forgotten about until a comment about an off-hand remark I’d made about another blog post popped up in my RSS feed. Then (again, not being a disciplined blogger), I forgot about that half-finished post until I started thinking about writing a new post and checked my WordPress admin.
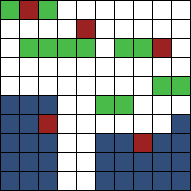
In the last post, we discussed one way you could randomly generate a two-dimensional array of values representing ground, platform, and trap tiles. For example, it might look like this:
The trick, of course, is to convert each of these chunks into actual Unity objects, and to do so in a way that performs well.
Because we’ll be adding new chunks as needed, we want to make sure we don’t freeze play due to adding large chunks that are costly to instantiate. Because we want to restart the level quickly (without reloading the scene), we want to minimize the cost of creating new game objects.
Pool ALL the objects
I’ll admit to a certain amount of superstitious cargo cult programming. XNA has made me deathly afraid of allocating new objects (which is why you’ll often see me creating temporary method variables as private fields) and SharePoint has made me scrupulous about the use of using/Dispose.
Unity’s contribution to my neurosis is object pooling. I build an object pool system anytime I instantiate new objects, whether or not I really need it for a simple 2D game jam game.
The general idea of object pooling is that the creation and destruction of new objects are expensive, so you should instead deactivate (rather than destroy) and reuse (rather than create).
In my endless runner, I have a very simple construct where each tile type is represented by an int, and then I have a Dictionary that essentially caches a set of game objects for each tile type in my ChunkManager class:
public enum LevelBlock : int
{
    Nothing = 0,
    Floor = 1,
    Platform = 2,
    Spike = 3,
    Laser = 4,
    FlameLR = 5,
    FlameUD = 6,
    CannonLR = 7,
    CannonUD = 8,
}

Dictionary<int, List<GameObject>> blockPool = new Dictionary<int, List<GameObject>>();
I can then go through my generated level chunk tile-by-tile, reusing old, deactivated blocks wherever possible and instantiating new blocks as necessary:
public GameObject[] Prefabs;

GameObject InstantiateBlock(Transform parent, int index, float x, float y)
{
    // Get from pool
    for (int i = 0; i < blockPool[index].Count; i++)
    {
        if (!blockPool[index][i].activeSelf)
        {
            blockPool[index][i].SetActive(true);
            tmpPos.x = x;
            tmpPos.y = y;
            tmpPos.z = 0;
            blockPool[index][i].transform.parent = parent;
            blockPool[index][i].transform.localPosition = tmpPos;
            return blockPool[index][i];
        }
    }

    // Instantiate new
    tmpBlock = (GameObject)Instantiate(Prefabs[index]);
    tmpPos.x = x;
    tmpPos.y = y;
    tmpPos.z = 0;
    tmpBlock.transform.parent = parent;
    tmpBlock.transform.localPosition = tmpPos;
    blockPool[index].Add(tmpBlock);
    return tmpBlock;
}
To put it simply: each tile value is represented by a number. That number also maps to an index in a set of prefabs, as well as a set of object pools. When tile 1 is requested, we create prefab 1 and store it in block pool 1.
Because my code is encapsulated cleanly enough, I can pre-populate this cache of blocks on startup, rather than waiting until the moment the player starts playing the game:
void WarmupPools()
{
    for (int i = 0; i < blockPool.Count; i++)
    {
        for (int j = 0; j < 50; j++)
        {
            InstantiateBlock(null, i, 0, 0).SetActive(false);
        }
    }
}
Creating the first chunk
Now that we’ve got an object pooling system for our tiles, we need to write some code that actually converts our two-dimensional array of tile values into Unity GameObjects. In this case, I used a method called InstantiateChunk, which we’ll see below.
This method takes a LevelChunk object, which contains the two-dimensional tile value array, as well as some information about where the chunk is located in Unity’s world space, and how it connects to other chunks. We’ll discuss this later when we handle that piece of the puzzle.
public float TileSize = 0.5f;
List<Transform> chunkTransforms = new List<Transform>();
void InstantiateChunk(LevelChunk chunk)
{
    // Create a parent container
    GameObject parent = new GameObject();
    parent.name = "Level Chunk";
    chunkTransforms.Add(parent.transform);

    // Set the chunk's position information based on the last chunk and the tile size
    chunk.WorldLength = chunk.Blocks.GetLength(1) * TileSize;
    chunk.WorldHeight = chunk.Blocks.GetLength(0) * TileSize;

    tmpPos.x = chunk.WorldX = (chunks.Count > 0) ? (chunks[chunks.Count - 1].WorldX + chunks[chunks.Count - 1].WorldLength) : transform.position.x;
    tmpPos.y = chunk.WorldY = (chunks.Count > 0) ? chunks[chunks.Count - 1].WorldY : transform.position.y;
    tmpPos.z = 0;
    parent.transform.position = tmpPos;

    // Generate blocks
    for (int y = 0; y < chunk.Blocks.GetLength(0); y++)
    {
        for (int x = 0; x < chunk.Blocks.GetLength(1); x++)
        {
            if (chunk.Blocks[y, x] == LevelBlock.Nothing)
                continue;

            tmpBlock = InstantiateBlock(parent.transform, (int)chunk.Blocks[y, x] - 1, x * TileSize, y * TileSize);
            if (chunk.Blocks[y,x] == LevelBlock.Floor)
            {
                SetFloorSprite(tmpBlock, chunk, x, y);
            }
        }
    }

    parent.layer = LayerMasks.WorldLayer;
    PolygonCreator.CreatePolygons(parent, chunk.Blocks);
}
The first thing to notice is that each chunk is instantiated as an empty parent object containing tiles. You don’t have to do this in your implementation, but I found it made positioning and debugging a lot easier.
You’ll also note that we’ve defined each tile’s size (in our case, they’re square, so length and width are the same) and we use it for positioning.
The last method calls out to a class called PolygonCreator, which creates a polygon 2D collider for each section of tiles in a chunk.
PolygonCreator exists because it’s not practical to add a box collider to each tile prefab.
I actually tried this to start out with, but the player often got stuck in between connected tiles. I suspect this was because of how collision detection behaves when there were two possible colliders that could stop the player side-by-side. (In theory, it should also save on processing power, since each collider doesn’t have to be considered separately.)
Code for PolygonCreator is here; you’ll want to replace references to LevelBlock and various physics layers with your game’s implementation. The code itself is based on this description of Theo Pavlidis’ contour-tracing algorithm. (I never thought I’d be writing code for a mathematical process that could be described in terms of a ladybug.)
Creating subsequent chunks
Generating a few chunks at the outset is a good start, but as players progress through the level, we want to do two things:
- seamlessly add new chunks before they’d appear on-screen
- delete old chunks after they’ve passed the camera, freeing up resources
The good news is, we’ve already done most of the heavy lifting on creating chunks. Now we just need to trigger these two events.
To do this, I added a LateUpdate() method to ChunkManager to do upkeep every frame. (I put this in LateUpdate so that all the other Update calls that might affect the world will be finished by the time we process this.)
Elsewhere in ChunkManager, I’ve collected an array of players. Each LateUpdate call, we’ll find the minimum and maximum player X coordinate, which we’ll use to determine which chunks could still show up on screen. (You could do the same thing with a single, non-split-screen game–it’d just be simpler code. You could also apply the same principle to creating Y-scrolling chunks.)
public PlayerCharacter[] Players;
[System.NonSerialized]
public float MinimumPlayerX;
[System.NonSerialized]
public float MaximumPlayerX;
float? minX;
float? maxX;
void LateUpdate()
{
    minX = null; maxX = null;

    // Get the front and back players' locations so we know when to delete and generate chunks
    for (int i = 0; i < Players.Length; i++)
    {
        if (!Players[i].IsPlayerActive())
            continue;

        if (!minX.HasValue || Players[i].transform.position.x < minX.Value)
            minX = Players[i].transform.position.x;
        if (!maxX.HasValue || Players[i].transform.position.x > maxX.Value)
            maxX = Players[i].transform.position.x;
    }

    if (minX.HasValue)
        MinimumPlayerX = minX.Value;

    if (maxX.HasValue)
        MaximumPlayerX = maxX.Value;

    CleanupChunks();
}
Once we do that, we’ll call CleanupChunks to add and remove chunks to meet our requirements.
[System.NonSerialized]
public List<LevelChunk> chunks = new List<LevelChunk>();

void CleanupChunks()
{
    if (chunks.Count <= 1)
        return;

    // If we've passed a chunk entirely, delete it
    while (chunks[1].WorldX + chunks[1].WorldLength < MinimumPlayerX)
        DestroyChunk(0);

    // If we've started a new chunk, create a new one
    if (chunks[chunks.Count - 2].WorldX < MaximumPlayerX)
        AddChunk(LevelChunkGenerator.BuildChunk(chunks[chunks.Count - 1]));

    UpdateChunkBounds();
}


[System.NonSerialized]
public float MinimumChunkX;
[System.NonSerialized]
public float MaximumChunkX;
[System.NonSerialized]
public float MinimumChunkY;
[System.NonSerialized]
public float MaximumChunkY;

void UpdateChunkBounds()
{
    MinimumChunkX = chunks[0].WorldX;
    MaximumChunkX = chunks[chunks.Count - 1].WorldX + chunks[chunks.Count - 1].WorldLength;
    MinimumChunkY = chunks[0].WorldY;
    MaximumChunkY = chunks[0].WorldY + chunks[0].WorldHeight;
}
This logic assumes that chunks are added to the chunks and chunkTransforms lists in left-to-right order, so that index 0 will always be the leftmost chunk, while the last index will always be the rightmost. We’re also giving ourselves a margin of 2 chunks in either direction, which might not be true for all games.
Because we stored the world (i.e., Unity transform) position of each chunk when we created it, we don’t have to calculate it here. Calculating it at instantiation made this logic simple.
Note that the UpdateChunkBounds() logic is optional for this particular implementation. However, it may be useful for other objects in your world. For example, in my endless runner, I deactivate any projectiles that reach the MaximumChunkX or MinimumChunkX. MinimumChunkY can be used to test for player deaths by pit.
Since we’ve implemented object pooling for blocks, our DestroyChunk() method needs to be a bit more complicated than simply destroying the parent game object.
Transform tmpTransform;
void DestroyChunk(int index)
{
    // Disable all blocks
    while (chunkTransforms[index].childCount > 0)
    {
        tmpTransform = chunkTransforms[index].GetChild(0);
        tmpTransform.parent = null;
        tmpTransform.gameObject.SetActive(false);
    }

    // Remove objects
    tmpTransform = chunkTransforms[index];
    DestroyObject(tmpTransform.gameObject);
    chunkTransforms.RemoveAt(index);
    chunks.RemoveAt(index);
}
In my implementation, I removed all of the blocks from the parent transform (setting them back to deactivated), and then destroyed the parent transform (under the assumption that one empty game object per chunk isn’t too expensive).
Conclusion
While this isn’t the complete code to my endless runner’s ChunkManager class, it’s the pieces that do the majority of the non-obvious work.
I will stress that all of this code needs to be adapted to your particular game. There are a lot of assumptions I’ve made given that the game involves multiple players running right (not up, left, or down) for short periods of time. For example, a game that allows players to move both directions might not be able to delete chunks at all!
It’s also important to respect the fact you’re performing a collection of expensive operations at regular intervals. Larger chunks give you more room to build, but they’re also going to be more expensive to instantiate. Displaying a large number of chunks on screen at the same time means you’re working with a larger pool of objects. There’s a lot of dials to fiddle with, and they’re all dependent upon your particular game.