
A few months back, I played around with (yet again) rebuilding a half-finished Metroidvania-style game I’ve played around with off and on over the years.
One of my goals in this experiment was to use base Unity functionality as much as possible, replacing 2D Toolkit and custom systems as much as possible. One of the prime candidates for such a rewrite was the menu system:
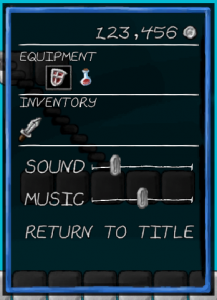 If it’s not immediately obvious, that’s essentially a vertical menu with items that have horizontal behaviors. When “Equipment” is selected, you can choose an item to use or equip on the horizontal axis. When a volume slider is selected, you can adjust the value with the horizontal axis.
Importantly, the game’s intended to be played with a gamepad, so I didn’t want the presence or absence of mouse or touch input to affect this behavior.
Unity UI navigation is pretty smart, and got me most of the way there. If you’ve focused on mouse/touch interface when building your UI, good news: if it’s a grid-ish format, it probably works the way you’d expect. That’s thanks to…
The Navigation Property
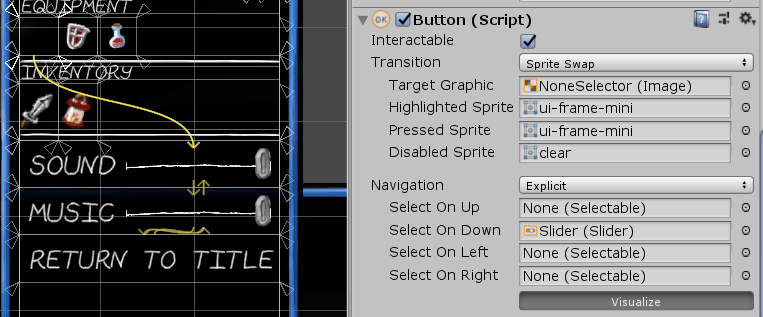
Selectable objects like buttons have a “Navigation” property. By default, this is set to Automatic, which again, does the right thing in most cases.
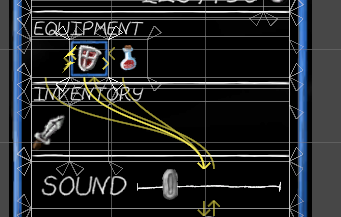
Unity uses each object’s position to determine which object will be selected when navigating up, down, left, or right. This is basically how controller navigation works: you’re building a large chain of objects, which can connect to up to 4 other objects. Helpfully, there’s a “Visualize” button which overlays yellow arrows indicating these connectors.
Aside from Automatic, the other Navigation options are:
- None: Turns off navigation entirely.
- Vertical and Horizontal: Works like Automatic, but limits navigation to horizontal or vertical connections.
- Explicit: As shown above, allows you to explicitly set the objects that are selected on up, down, left, and right navigation.
Explicit requires a bit of micromanagement, so it’s best to use it only if one of the other options doesn’t give you what you want.
It’s also (as we’ll see) something you can manipulate in scripts, which is helpful for generating menus on-the-fly or swapping behaviors. The Selectable class (the basis for several Unity UI components, and something you can inherit from for your own components) defines SetNavigationType, SetUp, SetDown, SetLeft, and SetRight methods for changing navigation properties.
Selectable interfaces
Another bit of Unity UI magic I took advantage of was the collection of selectable interfaces, specifically ISelectHandler, IDeselectHandler, and ICancelHandler.
Each of these interfaces has one method. If your MonoBehaviour implements one of these interfaces, Unity will pass certain UI-related events to it:
- ISelectHandler fires OnSelect if a Selectable object attached to the same game object receives focus.
- IDeselectHandler fires OnDeselect if a Selectable object attached to the same game object loses focus.
- ICancelHandler fires OnCancel if a Selectable object attached to the same game object is selected, and the user presses the “Cancel” button.
All of these methods accept a single “event data” parameter, which may be a different subclass depending on where it’s used.
Depending on what you’re doing, you may need to call its Use() method to get correct behavior. This signals to Unity that you’re handling the event in your code, rather than relying on Unity’s default behavior.
Rewiring Navigation properties
Our main stupid UI trick is rewiring navigation on the fly to build “submenus.”
My Equipment submenu is implemented as a Submenu “container” class which contains multiple SubmenuItem objects. The Submenu itself isn’t Selectable; it’s simply a manager for the items which are defined in the component.
The Submenu also knows a few other things, such as which items are “previous” and “next” for the submenu, and what the currently selected item is. For example, my submenu above knows that it’s the first item in the vertical list and is followed by the Sound slider. It works a little like the old PlayStation system menu, except rotated π/2 radians.
 (I should mention that my equipment submenu is an easy case. Since it’s a Metroidvania, I know all of the objects a player might ever have, and I’ve hard-coded them into the menu game objects.)
The code’s a little complex (partially because I tried to abstract it enough to be reusable), so if you want to follow along, it’s at https://gist.github.com/dylanwolf/603980854435b22c50c6c3833c87099e.
When the Submenu loads, I prep all of the submenu items by setting their navigation type to Explicit (using the SetNavigationType method of Selectable). Then, I iterate through each submenu items as follows:
-
- I set the explicit down navigation properties on the subitem to point to the Sound slider (using the SetDown method of Selectable). This means that no matter which item is selected, pressing down will select the Sound slider. (It’s also a good example of how Unity navigation isn’t necessarily one-to-one.)
- I set the explicit down navigation properties on the subitem to point to the Sound slider (using the SetDown method of Selectable). This means that no matter which item is selected, pressing down will select the Sound slider. (It’s also a good example of how Unity navigation isn’t necessarily one-to-one.)
- I set the explicit left navigation property (SetLeft method) on the subitem to point to the previous item in the list (if there was one), and modify the explicit right navigation property (SetRight method) on that item to point back.
- Once this initialization runs, I can navigate within the submenu as well as out of the submenu, but I can’t navigate into the submenu.
To do this, I implement ISelectHandler and IDeselectHandler on the submenu item. On selection, a submenu item does a couple of things:
- Updates the SelectedItem proprety of the Submenu object
- Updates the navigation of the “Previous” and “Next” objects to point to the selected item (in this case, calling the SetUp property of the Sound slider to navigate to the selected equipment icon).
On deselection, the submenu item changes the button image to a “grayed out” inactive image. This way, the player can see which item is selected, but knows the focus is elsewhere in the menu.
Redirecting navigation
I didn’t actually need to write any code to get the volume sliders to work right with controller navigation. Setting only the slider’s up and down navigation properties leaves left and right available to adjust the value when it’s selected.
However, I don’t want the player to have to click the slider to select it; I’d like to allow the player to click anywhere in the “Sound” or “Music” block.
To do this, I created a simple redirector class. It’s a Selectable that uses the None navigation type, so it can’t be selected with a controller. However, if the player clicks it, OnPointerDown is fired, which sends the focus to the slider:
public class SliderContainer : Selectable
{

    Slider slider;

    protected override void Start()
    {
        slider = GetComponentInChildren<Slider>();
        this.ClearAllNavigation();
        this.transition = Transition.None;
        base.Start();
    }

    public override void OnPointerDown(PointerEventData eventData)
    {
        slider.Select();
    }
}
I apply this to the parent UI element that contains both the “Sound” or “Music” label, the selection frame, and one slider. When anything in that area is clicked, it passes the selection down to the slider.
Preventing deselection
This is another problem that wouldn’t happen with a controller, but becomes an issue if a mouse or touchscreen is involved.
Unity’s default behavior is to clear selection when the player clicks outside of a Selectable object. Normally this is expected (it’s not fundamentally different from how most Windows applications behave), but in a controller-only game, recovering from a stray click could feel jarring.
It’s not hard to prevent this by adding the following component, which remembers the last selected object and forces the Event system to reset it if it ever becomes null.
public class PreventDeselectionGroup : MonoBehaviour
{
    EventSystem evt;

    private void Start()
    {
        evt = EventSystem.current;
    }

    GameObject sel;

    private void Update()
    {
        if (evt.currentSelectedGameObject != null && evt.currentSelectedGameObject != sel)
            sel = evt.currentSelectedGameObject;
        else if (sel != null && evt.currentSelectedGameObject == null)
            evt.SetSelectedGameObject(sel);
    }
}
Because I’m deactivating the entire “in-game menu” object tree when the menu closes and gameplay resumes, I don’t have to add any extra logic. When the menu is closed, the script isn’t running; when it is, no other Selectable UI elements should be active.
Closing the menu on Cancel
While the code to manage menu navigation and activation uses built-in Unity UI functionality, showing and hiding them menu relies on custom code. The game engine knows to stop play and show the menu when game state changes to “in game menu” mode; it also knows to hide the menu and resume play when game state changes to “playing.”
I can create a component that uses ICancelHandler to detect when the user presses the button designated as “Cancel” (Esc on the keyboard, or Start on a gamepad):
public class InGameMenuClose : MonoBehaviour, ICancelHandler {
    public void OnCancel(BaseEventData eventData)
    {
        Debug.Log("CANCEL");
        GameEngine.Current.ChangeState(GameEngine.GameState.Playing);
        eventData.Use();
    }
}
This tells Unity to call my game engine code and change the current mode; it also tells Unity to stop any additional processing it might do in response to a “cancel” message.
Unfortunately, I don’t think there’s a global cancel handler; OnCancel is only called on the selected object when Esc is pressed. To work as expected, every object in my menu with a Selectable component has to implement this handler.
There’s a number of ways we could solve this, but I chose to simply make my “InGameMenu” component add the close component to every child element on initialization. (Again, my menu’s hard-coded, so no new menu objects will be created after initialization.)
void InitMenu()
{
    if (!hasInit)
    {
        InventoryIcons = GetComponentsInChildren<InventoryIcon>();
        EquipmentItems = EquipmentMenu.Items.OfType<EquipmentItem>().ToArray();
        foreach (var obj in GetComponentsInChildren<Selectable>().Select(x => x.gameObject))
            obj.AddComponent<InGameMenuClose>();
        hasInit = true;
    }
}