Knoxville, TN

Ludum Dare 30 Post-Mortem

August 28, 2014

Ludum Dare 30 entryWhat went right:

I felt like the scope was perfect for the limited amount of time I had this weekend. This was mostly luck, but I also knew when to quit tweaking and didn’t regret it.

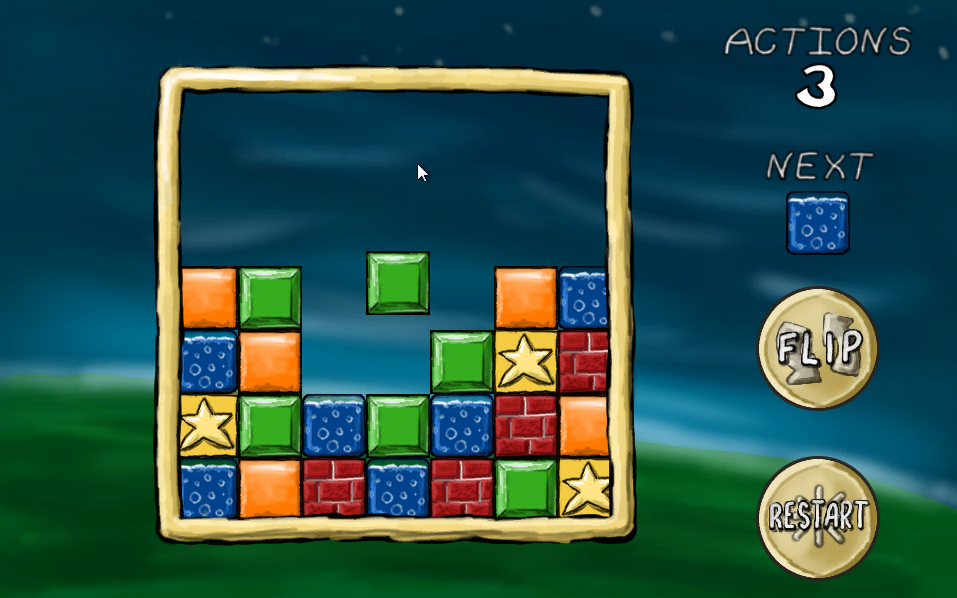
The match-3 and block-dropping algorithms fell into place like magic. To be fair, I’d given it some forethought–I did a quick Unity refresher on Wednesday where I attempted to build the line-clearing mechanic of Tetris with help from this tutorial. However, that’s a much simpler algorithm and I didn’t have an exact plan. It was a leap of faith that paid off early, leaving all of Sunday for polish. (I’d probably remiss if I didn’t mention that the match-3 concept was inspired by the time I spent in SeishunCon‘s digital gaming room this year.)

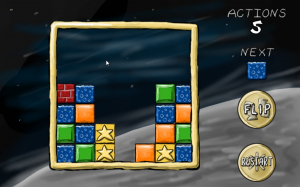
I’m happy with the art. I didn’t stretch myself stylistically, and it’s not as crisp and detailed as what I’d hoped, but overall it feels pretty slick if you don’t look too closely. I love posting those screenshots because it feels like a “real” game (well, at least to me).

As in the past, adding a GVerb track covers over a multitude of recording sins. I’m going to say this a lot in this post, but this feels like cheating.

Driving 40 minutes back from the Knoxville Game Design meetup is always a good way to start thinking about design and algorithms.

What could have gone better:

Tiles in a grid

I basically shoehorned a puzzle game into the theme. This was premeditated, mainly because I was itching to dip my toe into the genre. It restrained the scope by removing the need for level design, which helped. However, it also felt like cheating the system to start thinking about a game genre so early (especially since I feel like my LD29 entry was a much stronger “Connected Worlds” concept).

Overall gameplay was good, but not great. I’m happy with this in one sense–I didn’t make a ton of explicit design decisions, so I won the “go with whatever’s easiest” lottery. Still, I feel like the “flip or drop” choice is missing something. I enjoy the game, but I restart as soon as I clear out all of the obvious flip combos. Once I have to drop blocks, it’s like I’ve failed. I feel like a “flip or shift” mechanic would have been better.

What went wrong:

Because I wasn’t livestreaming, I tried to do a status update video on Friday night. OpenBroadcaster doesn’t work smoothly on my laptop. I wasted about an hour or so tinkering with OBS on a night I ended up staying up until 4am.

I don’t understand music. Originally, I picked the current chord progression as a base, then played some random notes over it on a second track. Seemed clever on Saturday, but on Sunday I realized it was too chaotic. After talking to Mike at the post-LD meetup, I think I need to study up on some music theory basics rather than hoping a clever experiment will pay off. (I feel like I’m reusing the same chord progressions and I always use a similar rhythm/picking pattern.)

Overall, I don’t feel like I stretched myself like I should have. I stick to the same style musically and artistically because I don’t have a lot of range. I stick to Unity because it’s all I know. To be honest, I’ve had a few good ratings in past LDs, so I avoid the unfamiliar because I want to keep that up. Next LD where I have the time, I need to set a few goals–for example, use Inkscape instead of GIMP, or use a digital tool like PxTone or Bfxr.

Ludum Dare 30 entry: Parallel Puzzles

August 25, 2014

The theme this time was “Connected Worlds,” and I decided I wanted to try writing a match-3 style puzzle game.

Ludum Dare 30 entry

Prototyping a card game with nanDECK, part 3

August 12, 2014

In part 1, I covered why you might want to use nanDECK in prototyping a card game, and in part 2, I covered how to build a basic template.

Now, let’s look at some of the directives I used to build my Encounter deck template. In this case, I’m still using the Title, Description, and Count fields, but I’ve also added Life and Cards fields:

nanDECK Spreadsheet

Again, note that some cards intentionally leave these columns blank. I wanted to add some immediately resolved effects that should be distinguished from “standard” Encounters that remain in play until handled.

Using variables

In the simple example, we created a variable called [all] to save us from having to redefine our range in every directive. This was really a bit of lampshading on my part, because the syntax for “all cards in this spreadsheet” isn’t really clear. There are other reasons you might want to use them, though.

Let’s say we have a lot of text blocks on our card, that all stretch the entire length of the card. Rather than hard-coding the width value in every directive, we can reuse it as a variable:

[text_width]=4.58
font="arial",16,"",#000000
text=[all],[Title],0.25,0.25,[text_width],1,"left","top"

Note that we could define our margins the same way if we wanted. In this case, it’s just easier to type out “0.25” than to write “[marginx]” every time and (these being prototypes) I don’t envision I’ll be tweaking layout much.

Conditional blocks

As I said earlier, I want to have two types of Encounter cards–“standard” Encounters with numeric stats, and Encounter cards that trigger effects when flipped. While I could separate these into different spreadsheets or create ranges in my script, that’s a huge hassle–I’m using nanDECK because I don’t want to have to micromanage my spreadsheets.

In this case, I want to use a conditional:

nanDECK conditionals

Let’s look at this conditional step-by-step. The first part starts out relatively simple–almost like what I covered in part 2:

[all]=1-{(Title)}
linkmulti=Count
link=fog-encounters-update20140719.csv
cardsize=5.08,8.89
page=21.59,27.94,LANDSCAPE,HVEO,#FFFFFF,[all]
[text_width]=4.58
font="arial",16,"",#000000
text=[all],[Title],0.25,0.25,[text_width],1,"left","top"
font="arial",12,"",#000000

We end by changing the font, but we don’t follow it up with a “text” directive that prints any text. Note that “font” and “text” directives don’t have to be back-to-back. nanDECK will remember the last “font” you specified.

Here’s where the logic happens. We want to check if “Cards” (one of the two stats that our “standard” Encounters will have) is empty. If it is, we just want to show the description. If it isn’t, we want to show all our numeric stats ahead of the description.

We start our block as follows, checking to see whether “Cards” is not a blank string of text.

if=[Cards]<>""

nanDECK’s “if=” seems a bit bizarre if you’re used to writing code, but remember, everything is a directive.

To explain the rest of this jumble of punctuation, note that Cards is encased in [brackets] to denote it’s a column in our spreadsheet, the “<>” operator means “is not equal to”, and the empty quotes (“”) refer to an empty string of text.

(Note that I’m not testing all of my stat columns here, but I could if my requirements were different. If you use one stat, you’re going to use both of them. )

What comes next is indented for readability, but this isn’t nanDECK’s requirement. Once it encounters that “if” directive, everything that follows will be executed only if it’s true. nanDECK is looking for an “else” or “elseif” directive.

Here we have more numbers, but if you remember part 2, you should be able to decipher this.

text=[all],"Cards:",0.25,1.25,2,1,"left","top"
text=[all],"Life:",0.25,2.25,2,1,"left","top"

We start out by creating labels for our numeric values, setting them along the left margin (0.25cm left) and 1cm apart from each other vertically (at 1.25cm and 2.25cm). Because the labels are small, we allow 2cm width.

 text=[all],[Cards],2.25,1.25,2,1,"left","top"
 text=[all],[Life],2.25,2.25,2,1,"left","top"

Next, we fill in the values. Because we’ve already reserved 2cm of width from the label, we set them at 2.25cm left, giving ourselves a bit of a margin. Since they’re on the same lines as the labels, our vertical values are the same. We’ll also allow 2cm here because numeric values will be short.

htmltext=[all],[Effect],0.25,3,[text_width],5.39

Finally, we display the Description as HTML just below the last numeric stat, and have it fill the rest of the space on the card.

Now, let’s handle what happens if we don’t have a value for [Cards]:

else
    htmltext=[all],[Effect],0.25,1,[text_width],7.39
endif

“Else” tells nanDECK that we want to switch, and handle the opposite case–what should happen if Cards does not have a value. (Note that you don’t have to have an “else” directive for every “if”.) In this case, we want to display the Description starting at the top of the card.

We finish off the block with an “endif” directive, which simply tells nanDECK that we’ve ended the “if” block.

This is, admittedly, a simple example–you can, for example, nest “if” blocks inside of each other, or use “elseif” directives to define multiple conditions.

This should be enough to get you started if you’re interested in using nanDECK. Remember, if you want to dive in to nanDECK, the manual will be your most valuable asset. It’s not always perfect, but it does cover every directive.


Prototyping a card game with nanDECK, part 2

August 10, 2014

In part 1, I covered why you might want to use nanDECK in prototyping a card game. Now, let’s get into the nuts and bolts of building a template.

A simple example

In my last post, I mentioned that Player Actions were simple title-and-description cards. In fact, that’s all that’s really in my spreadsheet: Title, Description, and Count (for the number of copies of each card in the deck). Note that I’ve also got a calculated field in my spreadsheet showing the total number of cards in the deck–in this case, 86.

Player Actions CSV

“Description” belies some complexity: I want to be able to include line breaks and, if possible, formatted text.

Of course, there’s the game design equivalent of a “code smell” here–if I’m regularly using the same mechanics over and over, then I probably need to introduce some keywords. And if I’m introducing multiple keywords, then maybe that needs to be its own column in my CSV, rather than a bold term that appears in the Description.

For example, my Action deck has a few cards that players can keep for semi-permanent effects, so why write out “players can keep this, can only have one copy, etc. etc.” on every card? Applying the label “Item” would be far simpler, and then refer the player to the rulebook.

Once we’ve got a spreadsheet set up in Excel or OpenOffice, we need it in a text format that nanDECK can read. To do this, go to Save As… and select either “Comma separated values” or “CSV.” Don’t worry too much about options, as the defaults will work for most scenarios–just make sure that the delimiter is CSV.

Save as CSV

Now, let’s take a look at the configuration I’m using for this deck. Note that every directive from this section is explained in the nanDECK manual. If you want to follow along, you can download the .nde file here (you’ll need to provide your own CSV file with Title, Description, and Count columns.)

nanDECK simple example

Building a template in nanDECK is somewhere between creating a configuration file, programming, and writing HTML. Every line starts with a directive (the text on the left side of the equals sign) that is passed a number of values (the list, separated by commas, on the right side of the equals sign).

Order is sometimes important, and you can create conditional blocks, but there’s typically not the sort of “flow control” you think of when programming. (Again, if your layout is getting that complex, you’re probably out of the prototyping stage anyway.)

First, we’ll set up a variable called [all], which will represent all cards in the set. The line below might be best read as “[all] represents a set of cards starting at 1 and ending with the last row that has a Title value.” (I’ve never found a reason not to do this. Multiple card formats probably should be stored in separate layouts and spreadsheets.)

[all]=1-{(Title)}

Next, we tell nanDECK that the “Count” field in our spreadsheet represents the number of copies of each card:

linkmulti=Count

We also tell nanDECK where to find that spreadsheet. In this case, we assume that we’re storing the CSV in the same folder as our nanDECK NDE file:

link=fog-actions-update20140719.csv

Next, we want to define the size of each card. nanDECK will use this to lay out our cards.

cardsize=5.08,8.89

I know what you’re thinking: those numbers look odd. That’s because nanDECK uses  centimeters, not inches. (Yes, it’s a hassle, but Google will easily do these translations for you.) We’re just talking about a normal 2″ x 3.5″ business card here: width first, then height.

We also need to tell nanDECK what size paper we’re using:

page=21.59,27.94,LANDSCAPE,HVEO,#FFFFFF,[all]

That’s a lot of parameters, but nanDECK should give us some hints (though we’ll really need to refer back to the manual on what it means):

nanDECK hints

Again, the first two parameters are in centimeters. We’re just telling nanDECK that our page is 8.5″ wide (21.58cm) by 11″ tall (27.94cm), in landscape mode, centered vertically and horizontally (the HV), has no printed guides on either odd or even pages (the EO), is white, and should be used for all cards in the set.

That’s a mouthful, but remember: if we stick with one type of paper for all our card prototyping, we can copy and paste this into every template without having to think about it.

Next, let’s actually write some text:

font="arial",16,"",#000000
text=[all],[Title],0.25,0.25,4.58,1,"left","top"

We’re telling nanDECK to use 16 point black Arial for whatever follows this TEXT directive. Then, we’re creating a text block on all cards in the set, with the Title value for each card printed out in the text block. Our text block should be indented 0.25cm from the top and left side of the card, and be 4.58cm wide by 1cm tall. (4.58cm + 0.25cm margins = 5.08cm wide card)

Note that we are defining the size of the text block, not just its position, which means it may get cut off. We’ll want to double check our layout against our card set before we actually print to make sure this doesn’t happen. (Typically, I print to PDF from nanDECK, review the PDF, and then print from there.)

To print the description, we do something similar:

font="arial",12,"",#000000
htmltext=[all],[Description],0.25,1,4.58,7.64

This time, we’re telling nanDECK that our text block containing the Description value for each card should be formatted as HTML. That means our <br/> tags will be interpreted as line breaks, and we can use <b> or <i> to format certain bits of text.

That’s all there is to it. If we type this into a nanDECK tab and click “Validate+Build,” we should see our cards to the right. We can then click “Table” to actually flip through our cards, ensuring that the randomization “feels” right.

The nanDECK Validate+Build and Table buttons

The nanDECK Validate+Build and Table buttons

In the next post, we’ll get into conditional formatting.

(Continued in part 3.)

Prototyping a card game with nanDECK, part 1

August 8, 2014

Sometime last year, I started playing around with prototyping a card game. At its core, it’s a hidden-loyalty game strongly influenced by The Resistance and Battlestar Galacticabut with combat influenced Lunch MoneyAs such, it’s required a lot of tweaking for the little playtesting I’ve done.

I recently dug up and updated my prototype, throwing away long-removed cards and reprinting heavily marked-up cards.

This has all been a rather painless process because I chose to use nanDECK for printing my prototypes. This allowed me to manage my deck lists in spreadsheets, which I then feed into nanDECK whenever I want to do a printing. (And deck list management was a concern for me, since I had three decks–Loyalty, Player Actions, and Encounters.)

I won’t say nanDECK is a useful tool for every deck you need to prototype. There are other programs that will spit out printable cards from a CSV–likely much, much easier to configure. nanDECK’s configuration is rather esoteric, and some of it feels like it slowly evolved out of bolted-on user requests.

In part 2 I’ll talk about how to actually write these configurations. But for now, let’s talk about the reasons you would (and wouldn’t) want to use nanDECK.

Reasons I used nanDECK

Testing card probabilities: My game contains multiple copies of the same card, so I wanted to be able to adjust the numbers to tweak the “feel” of the randomness (ideally, without having to print up cards). Fortunately, nanDECK has a “Virtual Table” feature that allows you to draw cards from a shuffled version of the deck.

nanDECK Virtual Table

My own card layouts and spreadsheets: My Encounter cards don’t fit into a simple title-and-description format. Some (but not all) Encounter cards include some numeric values.

While I could simply embed these in one long description, I wanted to make them columns in my CSV file. I also wanted my card template to conditionally hide these fields (and their labels) if they were empty in the spreadsheet.

Custom card formats: For simplicity and uniformity, I prototype with perforated Avery business card templates. This is extremely convenient for me, so long as I can make the cards fit the template. (If I was using Word, this would be easier, but it would also require me to copy-and-paste a lot of cards.)

I needed to be able to force my cards into a non-standard 2″ x 3.5″ format, and (more importantly) ensure these cards were laid out matching the perforations.

Cases where nanDECK wouldn’t be useful

Simple title-and-text cards: If your cards don’t benefit from a custom layout, then it’s probably not worth wrangling nanDECK’s templating system.

Unique cards: If there will be one and only one copy of each card in your deck, nanDECK isn’t going to be worthwhile. You’re better off using something like word (even if trying to maintain your card list might be a bit awkward).

Anything beyond initial prototyping: If you’re adding card art or you’re no longer juggling card text on a regular basis, nanDECK is more complicated than helpful. At this stage, you’re better off laying out cards in a desktop publishing or graphics application.

(Continued in part 2.)

Managing collections of objects in XNA: Structs vs. Classes

February 3, 2010
space shooter

Obviously, these aren’t the final graphics.

A couple of weeks ago, I started working on an XNA space shooter game. It’s 2D and completely sprite based–the type of thing that you wouldn’t think was that hard to do. And yet, I put most of the inner workings of the gameplay through two rewrites in that time.

The first draft

At first, I wrote a nice class structure: every gameplay object originated from an abstract class called GameObjectBase, which defined methods to handle Update, Draw, and intersection with other types of game objects (projectiles, the player’s ship, etc.). Then, each additional type of game object had its own abstract base class that, again, defined key pieces of behavior: EnemyBase, ProjectileBase, PowerupBase. The main game loop itself would keep track of all of these game objects, calling Update and Draw on them as necessary.

The plan here was to be able to define a new class for each type of enemy and weapon so that I can define whatever behavior I need for them. That’s what I’m really going for here: I want the option to do interesting things with various weapon powerups. And I think I’d actually hit upon an elegant solution.

When you first fired it up, the game ran fine for a while. But there was a problem: garbage collection. Each new enemy or bullet created a new object and stuffed it into the main game object list; each time one of these enemies was destroyed it was removed. Considering that the player can fire ten bullets per second, that’s a lot of objects. Eventually, the garbage collector had to clean up all of these old objects, essentially freezing up the game for a few seconds.

Continue reading

Crash issues after installing VS2010 Beta 2 / .NET 4.0 Beta 2

November 17, 2009

This is a random post, but I figure it might help someone, since I couldn’t figure out what was going on for the longest time.

I installed Visual Studio 2010 / .NET 4.0 Beta 2 last night. When I restarted my laptop, I noticed that both the Microsoft Online Services Sign-In app and the Curse-Gaming Client crashed. When I tried to start them manually, the same thing happened.

There were no errors in the Event viewer and no log files, so there was no obvious reasoning. Repairing the .NET 4.0 and .NET 3.5 SP1 installations didn’t fix anything either. The only clue I had was from trying to debug the crash in Visual Studio when prompted by Windows. Even then, the error was still cryptic: The type initializer for 'MS.Win32.Penimc.UnsafeNativeMethods' threw an exception.

Several Google searches later, I found the following fix:

  1. Run Command Prompt as Administrator.
  2. cd \windows\microsoft.net\framework\v3.0\wpf
  3. regsvr32 PenIMC.dll
  4. cd \windows\microsoft.net\framework\v4.0.21006\wpf
  5. regsvr32 PenIMC.dll

Once that was done, I was able to run both applications without error.

The Value of Cross-Training

November 3, 2008

While my job focuses on ASP.NET development, I still find myself going back to Python and SnakeSkin for personal web development projects. There’s really two reasons for this. One, I’ve got a pretty nice Linux virtual server hosting account through OpenHosting, so hosting on Apache gives me a lot of freedom. Two, I like the fact that it’s a bit lower-level than ASP.NET (so I’m a little closer to the HTML code) and not as opinionated as an MVC framework like Rails or CakePHP. Three, real men code in vi from the command line.

One of the great strengths of SnakeSkin/Albatross is its handling of form and session state. It’s roughly equivalent to ASP.NET’s ViewState. However, this makes AJAX work a little tricky. When a form is submitted, the posted fields are validated against the original structure of the form on the page; if they don’t match, SnakeSkin throws an exception. Great for keeping spammers out of your contact forms–but not so hot for changing page structure on the fly. And for years, I’ve sort of had to deal with this limitation. Usually, my workaround was to use a separate controller that returned XML data, which I then used to update the page through JavaScript. Fine for small things (and certainly less bandwidth-intensive), but not convenient.

I could go into the complexity of the problem even more, but it boils down to this: you can’t easily update one portion of the page directly. It’s all-or-nothing.

I eventually hit upon half of the solution to the problem a few months ago. If I updated an entire <form> tag in its entirety using prototype’s Ajax.Updater, then the form data would remain intact, and wouldn’t break when I submitted it again. But this was a very limiting solution. If you used multiple <form> tags on a page, then their session state (stored in hidden fields) would get out of sync as you updated each one individually. So, the only way to really make this solution work was to include only one <form> tag on the page. And if you’re doing that, you might as well not use AJAX at all.

It took some time, but the solution finally hit me. It was during Wally McClure‘s ASP.NET AJAX presentation at ETNUG. I had a pretty good idea of what was going on behind the scenes with ASP.NET AJAX, but I’d never really thought about it too much up to that point–the details were safely hidden from me in the Microsoft library, so there was no point in delving into the complexity.

But part of Wally’s presentation was to open up Fiddler and show the actual text of an ASP.NET AJAX response. The response contained the HTML code to be inserted into each UpdatePanel–which was pretty much what I expected. But it also included the updated ViewState as a separate field in the response. And that’s when it clicked.

All I had to do was modify SnakeSkin to spit out both the session state and the HTML response as part of an AJAX call. Then, when the response came in, I would iterate through the <input> tags on the page, and replace the contents of each hidden session state field. This didn’t require a lot of work on the back end (surprisingly, as I’d imagined the code to generate session state was hidden deep within the bowels of SnakeSkin), and only some minor tweaks on the front-end code I’d been using for AJAX.

So, last night, I actually got two-panel demo working. It’s obviously nowhere near as complicated as ASP.NET AJAX’s UpdatePanel–modifying my SnakeSkin page class to support updating multiple sections of the page in one call would just overcomplicate it at this point. But it is a somewhat elegant solution to the problem–that is to say, it’s encapsulated enough that the details of “how” are nearly invisible when you’re creating a page class.

I’ll post some samples if anyone’s interested, but SnakeSkin (and probably Albatross, the project it forked) is so obscure this doesn’t really matter to anyone but me.

The point is, I found it interesting that I solved a problem in one framework just by looking at another. I didn’t copy the solution directly, but it gave me a new way of looking at the problem. So, while you shouldn’t learn every framework, language, and platform out there, it helps to know more than one.

This is especially true in web development, because in a sense, web frameworks don’t matter. Every web application–every HTML-based application that is, since Flash and Silverlight aren’t constrained by the same limitations–is basically working with the same set of inputs, outputs, and limitations. From the user’s perspective, what you can do with one, you can do with any other framework, whether you’re using PHP or ASP.NET or Rails or SnakeSkin or Perl. Obviously, that doesn’t mean they’re all equally suited to every task. The value in the framework is on the back end–maintainability, productivity, data, and support. So as different as they are, all web frameworks can’t be that different in their fundamentals, which means it’s easier to compare, contrast, and borrow concepts in the web arena than it is on the desktop or server.

Outlining roles in maintaining a SharePoint site

October 7, 2008

I ran across an article today on SharePoint Magazine about Leveraging the SharePoint Platform. Overall, it’s a good (and realistic) discussion of how a SharePoint deployment must be planned supported within a company.

The section on people really stood out, because this was a point I made in my SharePoint presentation–if your deployment grows to any decent size, you can’t have just one person doing everything. Number of man-hours aside, it’s not reasonable for a single person to do configuration, administration, organization, development, and training. You’re trying to jump between a number of very different skillsets, so no matter how smart and capable your all-in-one SharePoint guy is, it’s not going to come out very good.

The article links to blog posts by Becky Isserman and Eric Harlan that attempt to define these roles a little more clearly. And for that reason, I think it’s a good read for anyone just getting started in a company that’s adopting SharePoint. Even if you won’t have a team of 4-6 people working on your SharePoint installation (and let’s face it, most people won’t), the division of skills is useful to divide up responsibilities between the team you do have–whatever size it is.

SharePoint Gotcha: Debugging Code Blocks and Event Handlers (or the lack thereof) in Site Pages

August 8, 2008

Here’s a problem one of the other developers here ran into–if you create your own site pages in SharePoint, you’re bound to see an error like this pop up:

An error occurred during the processing of /mypage.aspx. Code blocks are not allowed in this file.

… wait, what?

Yup, that’s what it says. You can’t use code blocks in ASPX files that are stored in SharePoint. No <% Response.Write("Hello World!") %>. No <%# Eval("Name") %>. As an added bonus, <asp:Button runat="server" ID="MyButton" OnClick="MyButton_Click" /> doesn’t even work because it declares an event handler.

That’s not really the gotcha here. This is well-documented in Inside Microsoft Windows SharePoint Services 3.0: check page 81, if you’re following along in your books at home. SharePoint has a very good reason for this security setting to be there: users can create and modify ASPX files that are stored within the SharePoint database. So, if you could run arbitrary code within an ASPX file, a user with no access to the server could potentially run malicious code.

So where does that code go? Well, it goes in the *.cs or *.vb code-behind file. That means to declare an event handler, you’re going to have to do something like this:

protected override void CreateChildControls()
{
    base.CreateChildControls();
    SaveButton.Click += SaveButton_Click;
    CancelButton.Click += CancelButton_Click;
}

And rather than displaying data in a GridView or Repeater using Eval() or Bind(), you have to give it an OnRowDataBound or OnItemDataBound handler. So that means, rather than doing this:

<asp:Repeater runat="server" ID="MyRepeater">
    <ItemTemplate>
        <asp:Literal runat="server" Text='<%# Eval("Name") %>' />
    </ItemTemplate>
</asp:Repeater>

You do this:

protected void MyRepeater_ItemDataBound(object sender, RepeaterItemEventArgs e)
{
    // Make sure we have a data item in this row
    if (e.Item.DataItem == null) { return; }

    // Convert the data item to its original type
    DataRowView dr = (DataRowView)e.Item.DataItem;

    // Find our literal control in the current repeater item
    Literal NameLiteral = e.Item.FindControl("NameLiteral") as Literal;

    // If it was found, set its value
    if (NameLiteral != null) { NameLiteral.Text = dr["Name"].ToString(); }
}

I can imagine you’re griping already. It’s easy to see the security reason for doing this–you don’t want users to be able to run arbitrary code on your server. But it’s so freaking complicated. (Well, it is until you get used to the idea.) But as I said, that’s not the real gotcha here. So what is the point of this post?

The real gotcha here is that this doesn’t seem to be a default security setting, at least in the development environments we’re using. (Andy’s using a VirtualPC image he set up himself; I’m using Microsoft’s WSS3 VirtualPC image.) We only ran into this issue after he tried to install a project on the client’s server.

I don’t think we’ve figured out exactly what turns on this security setting in SharePoint configuration, but I have found out how you can force your development environment to throw these sort of errors. All you have to do is dig into your development site’s web.config file and add the following node:

<configuration>
    <SharePoint>
        <SafeMode>
            <PageParserPaths>
                <PageParserPath VirtualPath="/*" CompilationMode="Always" AllowServerSideScript="false" IncludeSubFolders="true" />
            </PageParserPaths>
        </SafeMode>
    </SharePoint>
</configuration>

Once that’s done, you can now catch yourself using stuff that’s not allowed in ASPX pages before it gets to your client’s server.

×